Setelah berhasil menyelesaikan bab tentang menampilkan data orders, maka langkah selanjutnya adalah membuat sebuah component livewire untuk proses update data customer / profile customer yang sedang login.
Langkah 1 - Membuat Component My Profile
Silahkan teman-teman jalankan perintah berikut ini di dalam terminal/CMD dan pastikan berada di dalam project Laravel-nya.
        go


     php artisan make:livewire Account/MyProfile/Index
Jika perintah di atas berhasil dijalankan, maka kita akan mendapatkan 2 file baru, yaitu:
- Class Component:
app/Livewire/Account/MyProfile/Index.php - View Component:
resources/views/livewire/account/my-profile/index.blade.php
Langkah 2 - Membuat Route My Profile
Silahkan buka file routes/web.php, kemudian ubah semua kode-nya menjadi seperti berikut ini.
        php


     <?php

namespace App\Livewire;

use Illuminate\Support\Facades\Route;

//route register
Route::get('/register', Auth\Register::class)->name('register');

//route login
Route::get('/login', Auth\Login::class)->name('login');

//route group account
Route::middleware('auth:customer')->group(function () {

    Route::group(['prefix' => 'account'], function () {

        //route my order
        Route::get('/my-orders', Account\MyOrders\Index::class)->name('account.my-orders.index');

        //route my order show
        Route::get('/my-orders/{snap_token}', Account\MyOrders\Show::class)->name('account.my-orders.show');

        //route my profile
        Route::get('/my-profile', Account\MyProfile\Index::class)->name('account.my-profile');

    });

});
Di atas, kita menambahkan route baru untuk menampilkan halaman my profile.
        css


     Route::get('/my-profile', Account\MyProfile\Index::class)->name('account.my-profile');
Langkah 3 - Membuat Fungsi Update Profile
Sekarang kita akan membuat sebuah fungsi di dalam class component untuk proses update data profile, dimana kita juga akan mengimplementasikan upload gambar di dalamnya.
Silahkan buka file app/Livewire/Account/MyProfile/Index.php, kemudian ubah semua kode-nya menjadi seperti berikut ini.
        php


     <?php

namespace App\Livewire\Account\MyProfile;

use Livewire\Component;
use App\Models\Customer;
use Livewire\WithFileUploads;

class Index extends Component
{
    use WithFileUploads;

    public $image;
    public $name;
    public $email;

    /**
     * mount
     *
     * @return void
     */
    public function mount()
    {
        $this->name = auth()->guard('customer')->user()->name;
        $this->email = auth()->guard('customer')->user()->email;
    }

    /**
     * rules
     *
     * @return void
     */
    public function rules()
    {
        return [
            'image' => 'nullable|image|mimes:jpeg,png,jpg,gif,svg|max:2048',
            'name'  => 'required',
            'email' => 'required|email|unique:customers,email,'. auth()->guard('customer')->user()->id,
        ];
    }

    public function update()
    {
        // Validasi input
        $this->validate();

        // Cek apakah ada gambar yang di-upload
        if ($this->image) {
            // Upload gambar
            $imageName = $this->image->hashName();
            $this->image->storeAs('avatars', $imageName);

            // Update data pengguna dengan gambar
            $profile = Customer::findOrFail(auth()->guard('customer')->user()->id);
            $profile->update([
                'name'  => $this->name,
                'email' => $this->email,
                'image' => $imageName,
            ]);
        } else {
            // Update tanpa gambar
            $profile = Customer::findOrFail(auth()->guard('customer')->user()->id);
            $profile->update([
                'name'  => $this->name,
                'email' => $this->email,
            ]);
        }

        // Kirim pesan sukses
        session()->flash('success', 'Update Profil Berhasil');

        // redirect to the desired page
        return $this->redirect('/account/my-profile', navigate: true);
    }

    public function render()
    {
        return view('livewire.account.my-profile.index');
    }
}
Dari perubahan kode di atas, pertama kita import Modal Customer.
        perl


     use App\Models\Customer;
Kemudian kita import Traits dari Livewire untuk upload file.
        perl


     use Livewire\WithFileUploads;
Dan untuk menggunakan, maka di dalam class component kita harus meregisternya menggunakan keyword use.
        php


     class Index extends Component
{
    use WithFileUploads;

    //...
Setelah itu, kita buat 3 public properti.
        php


     public $image;
public $name;
public $email;
Kemudian kita buat method mount yang mana di dalamnya kita lakukan assign properti $name dan $email dari data customer yang login, sehingga nanti di form akan ditampilkan default data-nya.
        php


     public function mount()
{
	$this->name = auth()->guard('customer')->user()->name;
	$this->email = auth()->guard('customer')->user()->email;
}
Biar lebih aman, maka kita wajib menambahkan sebuah validasi untuk proses update data-nya, yaitu dengan membuat method rules dan mendefinisikan beberapa validasi di dalamnya.
        php


     public function rules()
{
    return [
        'image' => 'nullable|image|mimes:jpeg,png,jpg,gif,svg|max:2048',
        'name'  => 'required',
        'email' => 'required|email|unique:customers,email,'. auth()->guard('customer')->user()->id,
    ];
}
Kemudian kita buat method update, yang mana nanti akan dijalankan saat form disubmit.
        csharp


     public function update()
{

	//...

}
Di dalamnya, kita panggil dulu validasinya.
        scss


     // Validasi input
$this->validate();
Kemudian kita membuat sebuah kondisi, jika properti $image ada nilainya, maka kita akan update data beserta upload gambar, jika tidak, maka hanya name dan email saja.
        kotlin


     // Cek apakah ada gambar yang di-upload
if ($this->image) {

	//...

	//update with image

} else {

	//update without image

}
Jika proses update data berhasil, maka kita akan membuat sebuah session flash success dan kita arahkan ke halaman My Profile lagi.
        kotlin


     // Kirim pesan sukses
session()->flash('success', 'Update Profil Berhasil');

// redirect to the desired page
return $this->redirect('/account/my-profile', navigate: true);
Langkah 4 - Membuat Form Update Profile
Silahkan teman-teman buka file resources/views/livewire/account/my-profile/index.blade.php, kemudian ubah semua kode-nya menjadi seperti berikut ini.
        xml


     <div class="container">
    <div class="row justify-content-center mt-0" style="margin-bottom: 150px;">
        <div class="col-md-6">

            <x-menus.customer />

            <div class="card border-0 shadow-sm rounded">
                <div class="card-body p-4">
                    <h6>
                        <svg xmlns="http://www.w3.org/2000/svg" width="18" height="18" fill="currentColor" class="bi bi-person mb-1" viewBox="0 0 16 16">
                            <path d="M8 8a3 3 0 1 0 0-6 3 3 0 0 0 0 6m2-3a2 2 0 1 1-4 0 2 2 0 0 1 4 0m4 8c0 1-1 1-1 1H3s-1 0-1-1 1-4 6-4 6 3 6 4m-1-.004c-.001-.246-.154-.986-.832-1.664C11.516 10.68 10.289 10 8 10s-3.516.68-4.168 1.332c-.678.678-.83 1.418-.832 1.664z" />
                        </svg>
                        My Profile
                    </h6>
                    <hr />

                    <form wire:submit.prevent="update">

                        <div class="input-group mb-3">
                          <input type="file" wire:model="image" class="form-control rounded @error('image') is-invalid @enderror" v-model="image" placeholder="Upload Image" onchange="previewImage')">
                        </div>
                        @error('image')
                            <div class="alert alert-danger mt-2 rounded border-0">
                                {{ $message }}
                            </div>
                        @enderror

                        <div class="input-group mb-3">
                          <input type="text" wire:model="name" class="form-control rounded @error('name') is-invalid @enderror" v-model="name" placeholder="Full Name">
                        </div>
                        @error('name')
                            <div class="alert alert-danger mt-2 rounded border-0">
                                {{ $message }}
                            </div>
                        @enderror

                        <div class="input-group mb-3">
                          <input type="email" wire:model="email" class="form-control rounded @error('email') is-invalid @enderror" v-model="email" placeholder="Email Address">
                        </div>
                        @error('email')
                            <div class="alert alert-danger mt-2 rounded border-0">
                                {{ $message }}
                            </div>
                        @enderror

                        <button class="btn btn-orange-2 rounded" type="submit">Update Profile</button>
                      </form>

                </div>
            </div>
        </div>
    </div>
</div>
Dari penambahan kode di atas, pertama kita panggil component menu customer.
        xml


     <x-menus.customer />
Kemudian pada bagian form, kita berikan event wire:submit dan diarahkan ke dalam method update yang ada di dalam class component.
        bash


     <form wire:submit.prevent="update">

	//...

</form>
Langkah 5 - Uji Coba Update Profile
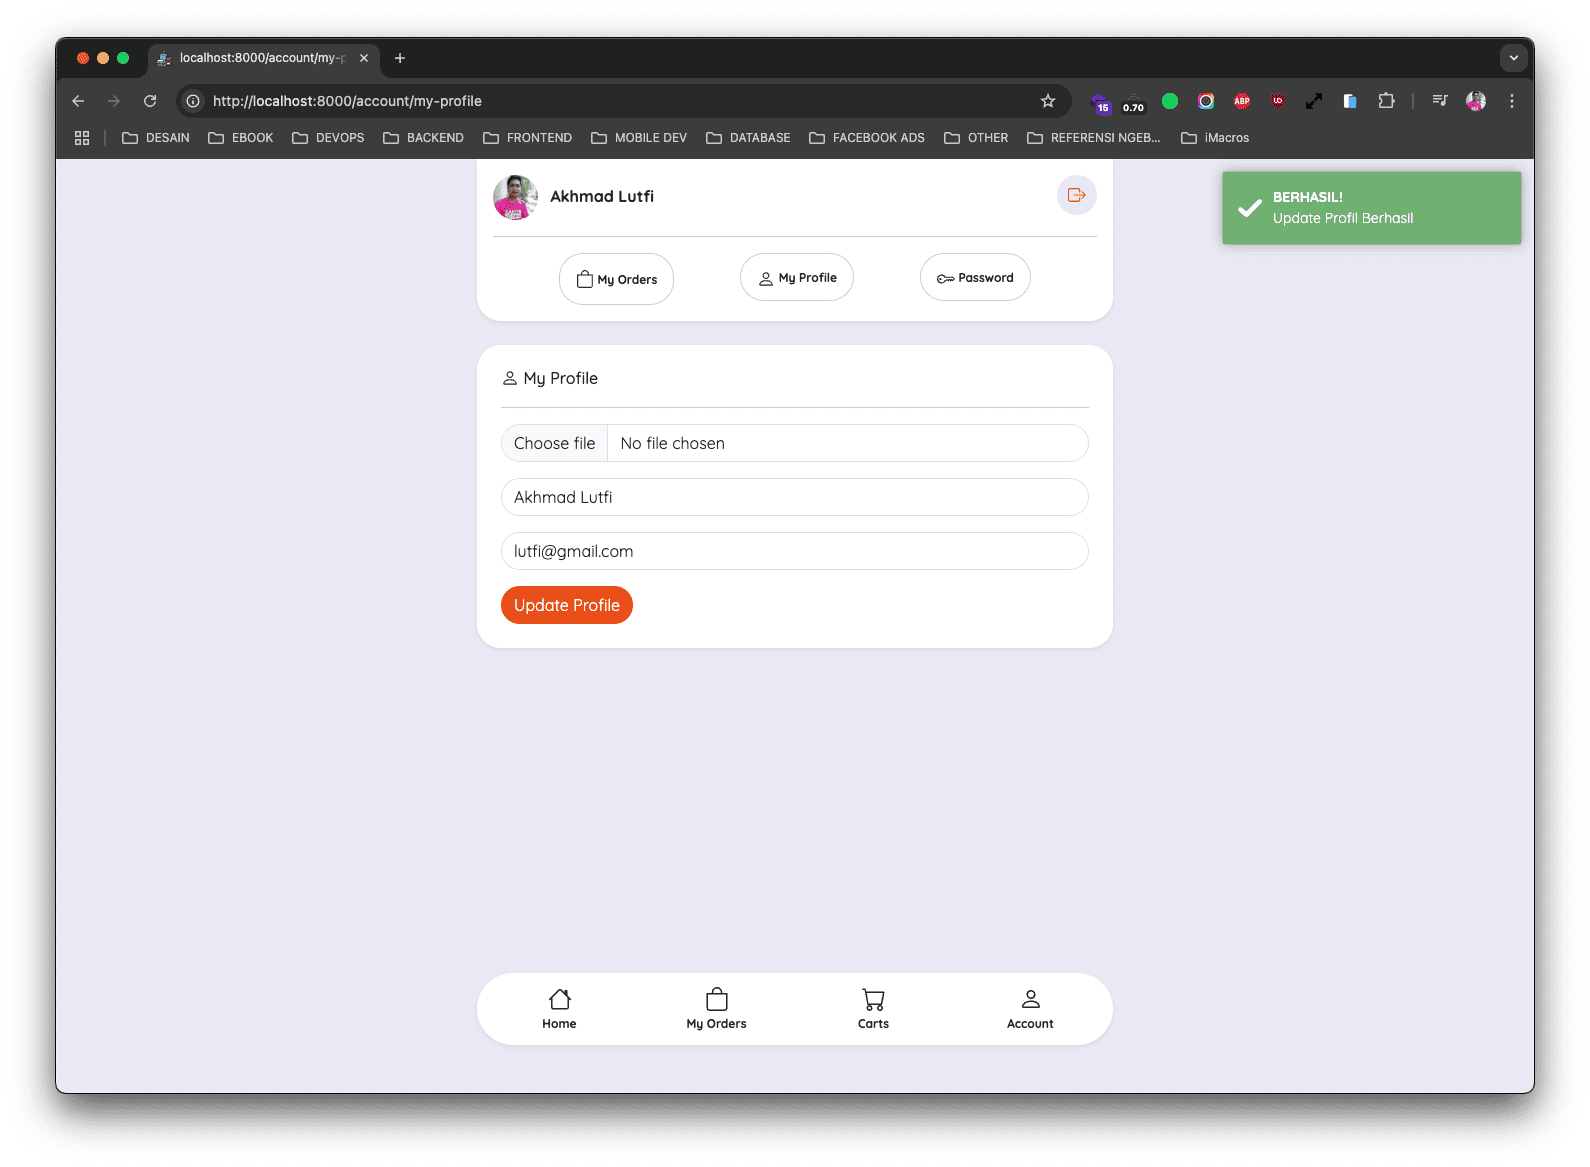
Sekarang silahkan klik menu My Profile, jika berhasil maka teman-teman akan mendapatkan hasil seperti berikut ini.
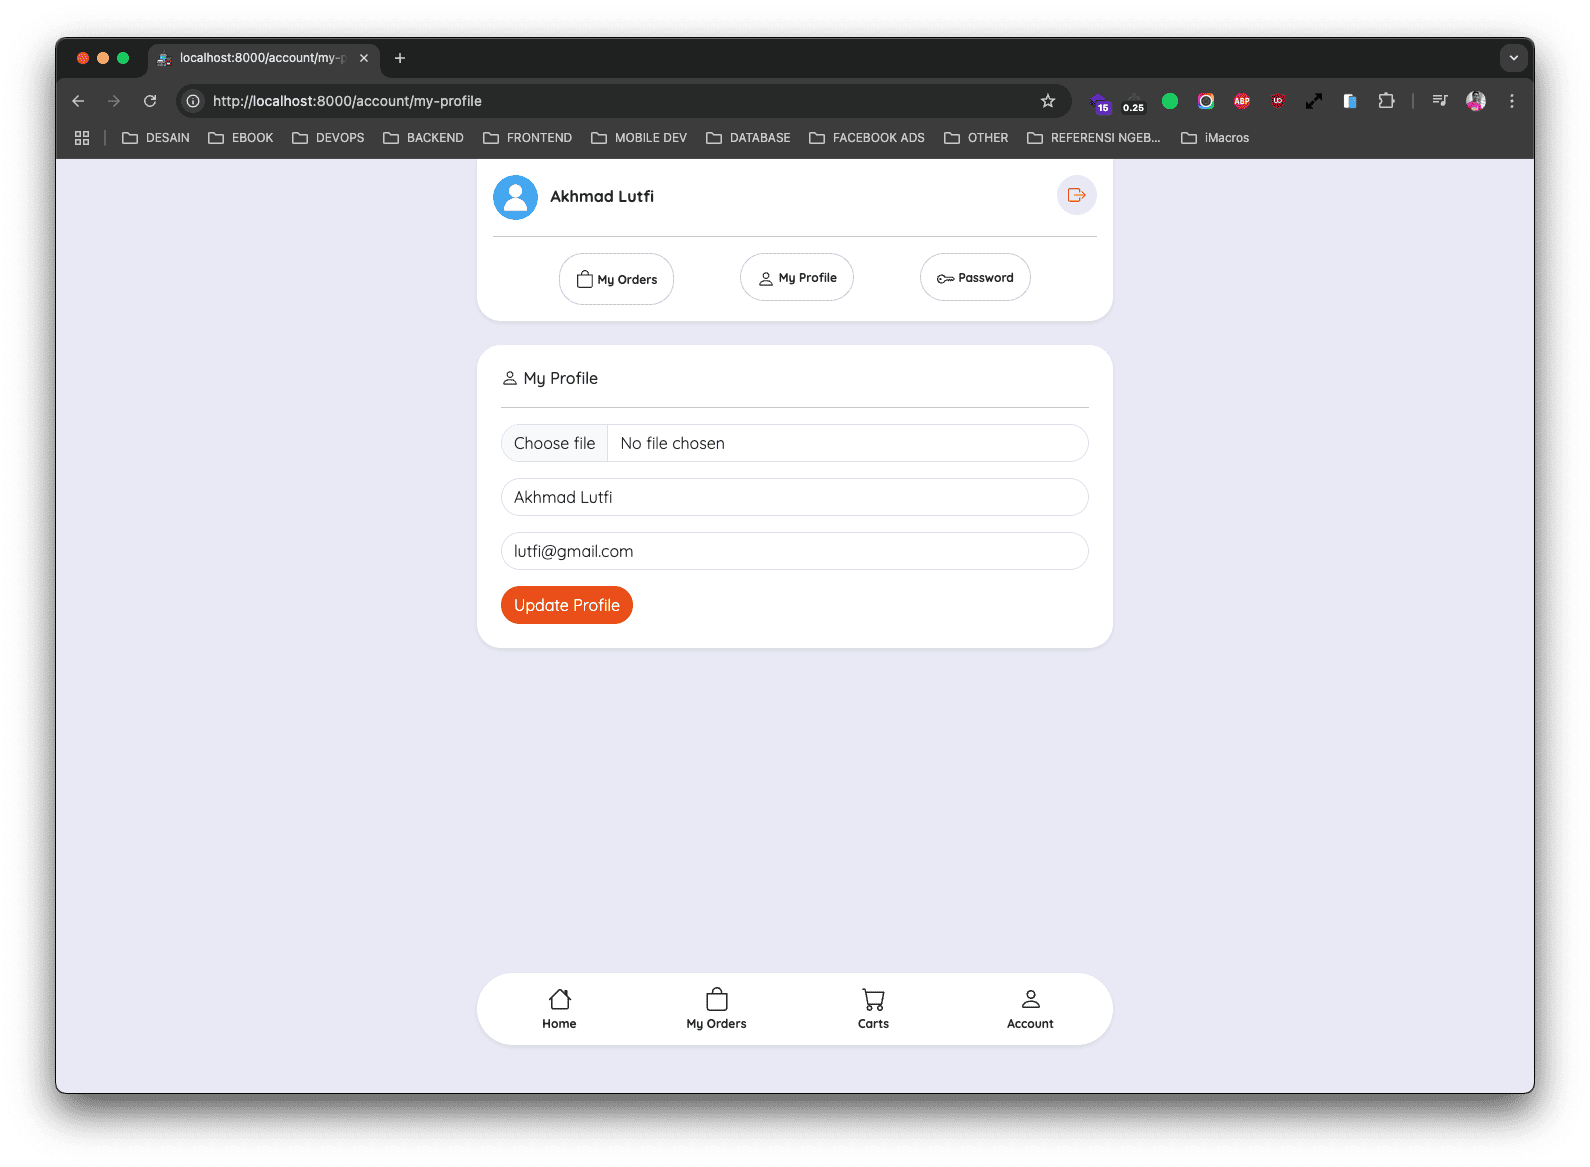
Silahkan teman-teman bisa ubah data-nya, seperti foto, name ataupun email, jika berhasil maka hasilnya kurang lebih seperti berikut ini.